Runner in the High

技術のことをかくこころみ

Firebase JS SDKのソースコード・リーディング(初期化処理周り)

最近諸事情あり業務でFirebase JS SDKのDatabase実装周りを読むことがあったので、備忘録的にブログ記事にしてみる。

初期化処理の雰囲気

Databaseまで含めると全体像があまりにでかすぎるので、とりあえず初期化処理周りだけを雰囲気でクラス図にしてみた。staticと書いてあるところはクラスではなくただ単にファイルとそこに定義されている関数であることを示している。

実際にDatabaseそのものの詳細な処理(コネクションハンドリングやら内部での状態管理など)はまた別で解説することとして、この図ではSDKの初期化に関連したクラスとメソッドのみを抜き出すことにした。

Firebase JS SDKの実装ではIoCコンテナとDIが設計において積極的に活用されており、独自のDIコンテナを内部実装している。ComponentというパッケージではDIコンテナの実装となるクラスがまとまっており、AppパッケージにはDIコンテナ(ComponentContainer)の初期化からのコンポーネントの登録など実際のコンテナ操作を行うクラスが多く含まれる。このふたつはFirebase JS SDKにおける基盤的なパッケージであると言える。

今回の図では機能のパッケージとしては Database のみを取り上げたが、Database に限らずそのほかのどの機能のパッケージも上記の図で言うComponentを生成する形で実装されている。新しく機能が増えたとしても、そのパッケージの実装をする側はクラス・インスタンスのライフサイクルをどのように管理するか、などの細かい処理を気にする必要がなく十分に抽象化された基盤を利用しつつ個別の機能パッケージの開発に集中できるようにする思想が垣間見える。

パッケージ間の関係性

App パッケージにおいて initializeAppSDKAPIとして公開されている関数であり、そこが実質的な処理のエントリポイントとなる。

この関数ではFirebase JS SDKにおいて中心的なクラスである FirebaseAppImpl と、それが保持するDIコンテナの実装である ComponentContainerインスタンス化を行っている。

export function initializeApp(
  options: FirebaseOptions,
  rawConfig = {}
): FirebaseApp {
  if (typeof rawConfig !== 'object') {
    const name = rawConfig;
    rawConfig = { name };
  }

  const config: Required<FirebaseAppSettings> = {
    name: DEFAULT_ENTRY_NAME,
    automaticDataCollectionEnabled: false,
    ...rawConfig
  };
  const name = config.name;

  //
  // 省略...
  //

  const container = new ComponentContainer(name);
  for (const component of _components.values()) {
    container.addComponent(component);
  }

  const newApp = new FirebaseAppImpl(options, config, container);

  _apps.set(name, newApp);

  return newApp;
}

特筆すべきはこの関数の中で参照されている _apps_components という変数で、この初期化のタイミングでComponentをコンテナに登録していることがわかる。この二つの変数は packages/app/src/internal.ts というファイルで定義されたグローバルなシングルトン・オブジェクトである。

_appsinitializeApp からのみ値が追加されるが _component_registerComponent という関数からも追加される可能性がある。これはDatabaseなど個別の機能パッケージから利用されるコンポーネント登録のための関数である。

/**
 * @internal
 */
export const _apps = new Map<string, FirebaseApp>();

/**
 * Registered components.
 *
 * @internal
 */
// eslint-disable-next-line @typescript-eslint/no-explicit-any
export const _components = new Map<string, Component<any>>();

//
// 省略...
//

/**
 *
 * @param component - the component to register
 * @returns whether or not the component is registered successfully
 *
 * @internal
 */
export function _registerComponent<T extends Name>(
  component: Component<T>
): boolean {
  const componentName = component.name;
  if (_components.has(componentName)) {
    logger.debug(
      `There were multiple attempts to register component ${componentName}.`
    );

    return false;
  }

  _components.set(componentName, component);

  // add the component to existing app instances
  for (const app of _apps.values()) {
    _addComponent(app as FirebaseAppImpl, component);
  }

  return true;
}

このようなシングルトン・オブジェクトが必要な理由はFirebase v8で下記のように機能ごとのパッケージの初期化ができるため。

import firebase from "firebase/app";
import "firebase/database";

上記のようにDatabaseパッケージがimportされると packages/database/src/index.ts から呼ばれる形で下記の registerDatabase 関数が実行される。

import {
  _registerComponent,
  registerVersion,
  SDK_VERSION
} from '@firebase/app';
import { Component, ComponentType } from '@firebase/component';

import { name, version } from '../package.json';
import { setSDKVersion } from '../src/core/version';

import { repoManagerDatabaseFromApp } from './api/Database';

export function registerDatabase(variant?: string): void {
  setSDKVersion(SDK_VERSION);
  _registerComponent(
    new Component(
      'database',
      (container, { instanceIdentifier: url }) => {
        const app = container.getProvider('app').getImmediate()!;
        const authProvider = container.getProvider('auth-internal');
        const appCheckProvider = container.getProvider('app-check-internal');
        return repoManagerDatabaseFromApp(
          app,
          authProvider,
          appCheckProvider,
          url
        );
      },
      ComponentType.PUBLIC
    ).setMultipleInstances(true)
  );
  registerVersion(name, version, variant);
  // BUILD_TARGET will be replaced by values like esm5, esm2017, cjs5, etc during the compilation
  registerVersion(name, version, '__BUILD_TARGET__');
}

_registerComponent 関数が呼ばれることにより _components にComponentが追加され initializeApp 関数の呼び出し時にDIコンテナへのComponentの登録が自動で行われる。ここでComponentクラスのコンストラクタ第2引数として渡されている無名関数はインスタンス生成処理のIFにあたる InstanceFactory の実装であり、なんとなくファクトリがいい感じで遅延実行される雰囲気を感じられる。

実際にファクトリとなる関数が呼びされるのは、コンポーネントの取得時(クラス図における _getProvider 関数の呼び出し時)になる。例えばDatabaseパッケージは getDatabase 関数の中でその呼び出しを行う。

 * Returns the instance of the Realtime Database SDK that is associated
 * with the provided {@link @firebase/app#FirebaseApp}. Initializes a new instance with
 * with default settings if no instance exists or if the existing instance uses
 * a custom database URL.
 *
 * @param app - The {@link @firebase/app#FirebaseApp} instance that the returned Realtime
 * Database instance is associated with.
 * @param url - The URL of the Realtime Database instance to connect to. If not
 * provided, the SDK connects to the default instance of the Firebase App.
 * @returns The `Database` instance of the provided app.
 */
export function getDatabase(
  app: FirebaseApp = getApp(),
  url?: string
): Database {
  return _getProvider(app, 'database').getImmediate({
    identifier: url
  }) as Database;
}

_getProvider の実装は FirebaseApp からComponentContainerを経由し該当のProviderを取得する動きになっている

/**
 *
 * @param app - FirebaseApp instance
 * @param name - service name
 *
 * @returns the provider for the service with the matching name
 *
 * @internal
 */
export function _getProvider<T extends Name>(
  app: FirebaseApp,
  name: T
): Provider<T> {
  // ...
  return (app as FirebaseAppImpl).container.getProvider(name);
}

Providerクラスは主にComponentクラス・インスタンスのライフサイクルを管理する責務を担っており getImmediate でその挙動をみることができる。

  /**
   *
   * @param options.identifier A provider can provide mulitple instances of a service
   * if this.component.multipleInstances is true.
   * @param options.optional If optional is false or not provided, the method throws an error when
   * the service is not immediately available.
   * If optional is true, the method returns null if the service is not immediately available.
   */
  getImmediate(options: {
    identifier?: string;
    optional: true;
  }): NameServiceMapping[T] | null;
  getImmediate(options?: {
    identifier?: string;
    optional?: false;
  }): NameServiceMapping[T];
  getImmediate(options?: {
    identifier?: string;
    optional?: boolean;
  }): NameServiceMapping[T] | null {
    // if multipleInstances is not supported, use the default name
    const normalizedIdentifier = this.normalizeInstanceIdentifier(
      options?.identifier
    );
    const optional = options?.optional ?? false;

    if (
      this.isInitialized(normalizedIdentifier) ||
      this.shouldAutoInitialize()
    ) {
      try {
        return this.getOrInitializeService({
          instanceIdentifier: normalizedIdentifier
        });
      } catch (e) {
        if (optional) {
          return null;
        } else {
          throw e;
        }
      }
    } else {
      // In case a component is not initialized and should/can not be auto-initialized at the moment, return null if the optional flag is set, or throw
      if (optional) {
        return null;
      } else {
        throw Error(`Service ${this.name} is not available`);
      }
    }
  }

shouldAutoInitialize はComponentの初期化タイミングを制御するフラグであるらしく、実装によれば LAZY, EAGER, EXPLICIT の3つから選択される。SDKにおけるComponentのデフォルト値もLAZYが指定されているため、基本的にはすべての機能のクラスがこの getImmediate のタイミングでファクトリの呼び出しによって実体化されると考えていいだろう。

実際の初期化処理は getOrInitializeService メソッドの中で行われ、ここでようやくComponentに登録された instanceFactory が実行されるのが分かる。すでにファクトリが実行されている場合には初期化処理をスキップする。

  private getOrInitializeService({
    instanceIdentifier,
    options = {}
  }: {
    instanceIdentifier: string;
    options?: Record<string, unknown>;
  }): NameServiceMapping[T] | null {
    let instance = this.instances.get(instanceIdentifier);
    if (!instance && this.component) {
      instance = this.component.instanceFactory(this.container, {
        instanceIdentifier: normalizeIdentifierForFactory(instanceIdentifier),
        options
      });
      this.instances.set(instanceIdentifier, instance);
      this.instancesOptions.set(instanceIdentifier, options);

      /**
       * Invoke onInit listeners.
       * Note this.component.onInstanceCreated is different, which is used by the component creator,
       * while onInit listeners are registered by consumers of the provider.
       */
      this.invokeOnInitCallbacks(instance, instanceIdentifier);

      /**
       * Order is important
       * onInstanceCreated() should be called after this.instances.set(instanceIdentifier, instance); which
       * makes `isInitialized()` return true.
       */
      if (this.component.onInstanceCreated) {
        try {
          this.component.onInstanceCreated(
            this.container,
            instanceIdentifier,
            instance
          );
        } catch {
          // ignore errors in the onInstanceCreatedCallback
        }
      }
    }

    return instance || null;
  }

なんとなく Componentインスタンスの生成手段や生成タイミングを保持するだけのデータ構造という雰囲気が強く、ファクトリで生成されたインスタンスのライフサイクルを管理するのが Provider であるように見える。

非常に典型的なDIコンテナの実装という感じ。

NameServiceMapping に関して

たとえば上記の getOrInitializeService メソッドだったり InstanceFactoryNameServiceMapping という型を返す実装になっている。

/**
 * Factory to create an instance of type T, given a ComponentContainer.
 * ComponentContainer is the IOC container that provides {@link Provider}
 * for dependencies.
 *
 * NOTE: The container only provides {@link Provider} rather than the actual instances of dependencies.
 * It is useful for lazily loaded dependencies and optional dependencies.
 */
export type InstanceFactory<T extends Name> = (
  container: ComponentContainer,
  options: InstanceFactoryOptions
) => NameServiceMapping[T];

この型は以下のような実装になっている。

/**
 * This interface will be extended by Firebase SDKs to provide service name and service type mapping.
 * It is used as a generic constraint to ensure type safety.
 */
export interface NameServiceMapping {}

export type Name = keyof NameServiceMapping;
export type Service = NameServiceMapping[Name];

上記のコメントに書いてある通りこれは型安全性を担保するためのもので、Databaseの場合にはindex.tsに以下のような形で関連する実装がある。

declare module '@firebase/component' {
  interface NameServiceMapping {
    'database': Database;
  }
}

あとはComponentのコンストラクタを見ればわかりやすい。DatabaseパッケージのComponent登録の処理では namedatabase になるため、該当するインスタンスの型が導きだされることが分かる。

export class Component<T extends Name = Name> {
  // ...

  /**
   *
   * @param name The public service name, e.g. app, auth, firestore, database
   * @param instanceFactory Service factory responsible for creating the public interface
   * @param type whether the service provided by the component is public or private
   */
  constructor(
    readonly name: T,
    readonly instanceFactory: InstanceFactory<T>,
    readonly type: ComponentType
  ) {}

  // ...
}
PlaywrightでGithub ActionのJob Summary用レポータを作るといい感じ

Github ActionにJob Summaryという機能があり、これを使うとActionの結果をmarkdownに対して出力できる。

github.blog

所属しているチームではPlaywrightをテストに使用しているのだが、毎回Actionの実行でエラーがおきたときにStepを開いて見に行く必要があり、まあまあ面倒。第一に見ずらい。

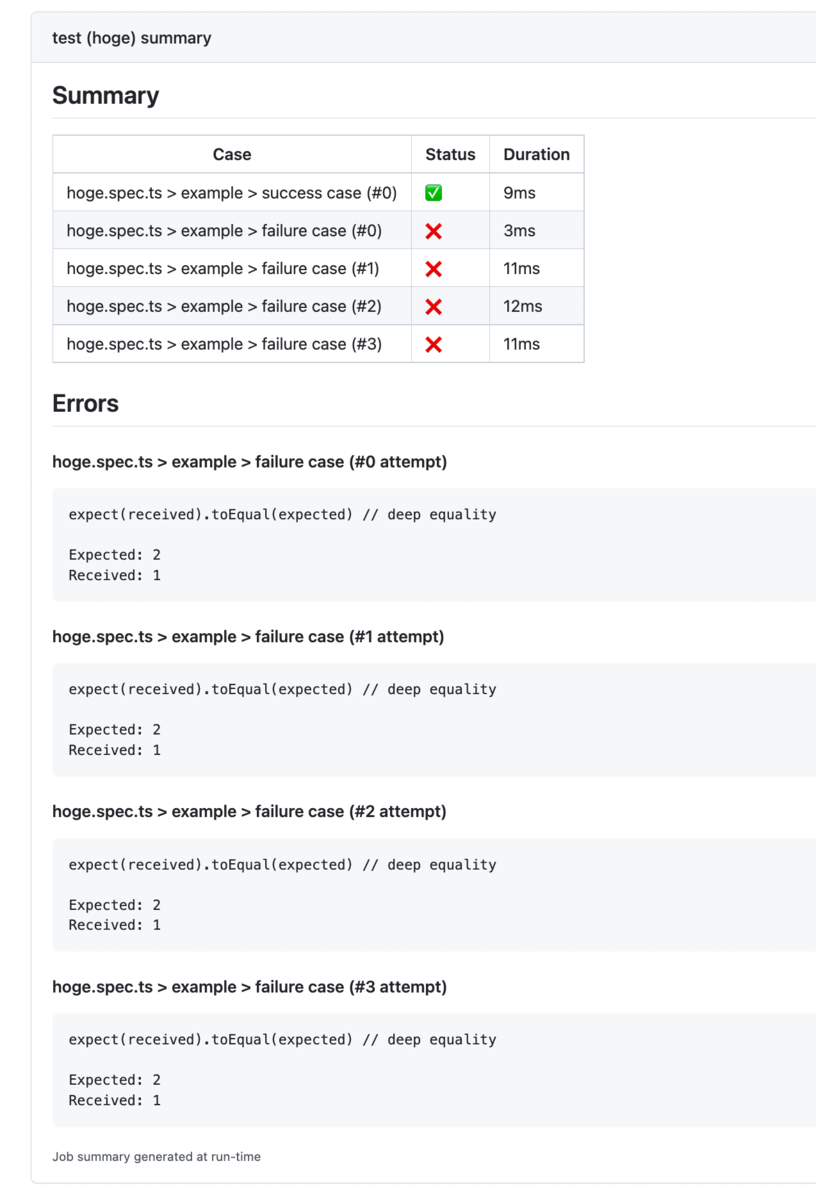
そこで、playwrightが提供しているReporterでJob Summary用の実装を用意すると、こんな感じでテスト結果をいい感じに表示できる。

エラーがあるときは各リトライの結果を表示させるようしている。

import * as fs from 'fs';
import {FullConfig, TestError} from '@playwright/test';
import {FullResult, Reporter, Suite, TestCase, TestResult} from '@playwright/test/reporter';

interface Error {
  title: string;
  error: TestError;
}

export default class GithubSummaryReporter implements Reporter {
  outputFile?: fs.WriteStream;
  errors: Error[];

  onBegin(config: FullConfig, suite: Suite) {
    const summaryFile = process.env.GITHUB_STEP_SUMMARY
    if (summaryFile) {
      this.outputFile = fs.createWriteStream(summaryFile, {flags: 'a'});
    }

    this.errors = [];
    this.writeOut("## Summary\n")
    this.writeOut("Case|Status|Duration")
    this.writeOut("----|------|--------")
  }

  onEnd(result: FullResult) {
    if (this.errors.length > 0) {
      let errorDetails = "\n## Errors\n"
      this.errors.forEach(({title, error}, attempt) => {
        errorDetails += `\n#### ${title} (#${attempt} attempt)`;
        errorDetails += "\n```diff\n";
        errorDetails += error.message.replace(/\x1b\[[0-9;]*[a-zA-Z]/g, "")
        errorDetails += "\n```\n";
      })
      this.writeOut(errorDetails)
    }

    if (this.outputFile) {
      this.outputFile.end();
      this.outputFile.close();
    }
  }

  onTestEnd(test: TestCase, result: TestResult) {
    const title = test.titlePath().filter(v => v !== '').join(' > ');
    const status = result.status === 'passed' ? ':white_check_mark:' : ':x:';
    if (result.status !== 'passed') {
      result.errors.forEach(error => {
        this.errors.push({title, error})
      })
    }
    this.writeOut(`${title} (#${result.retry})|${status}|${result.duration}ms`)
  }

  private writeOut(value: string) {
    if (this.outputFile) {
      this.outputFile.write(value + "\n");
    } else {
      console.log(value)
    }
  }
}

細かい話だが、エラーメッセージのsyntaxをdiffにすると差分がいい感じで表示できる。

あとはreplaceでANSIエスケープシーケンスを取り除くところもポイントで、playwrightはレポータに渡してくるエラーメッセージの文字列にカラーコードがつけっぱなしなのでレポータ側で外してやらないといけない。

Firebase Database REST API Streamingの挙動メモ

複雑すぎるのでまとめる

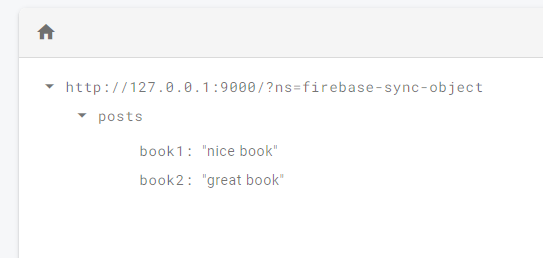
ベースとなるJSONの構造は以下。すべてFirebase Database Emulatorで試している。

posts配下へのフィールドの追加

{
  type: 'put',
  data: '{"path":"/book3","data":"awesome book"}',
  lastEventId: '',
  origin: 'http://localhost:9000'
}

posts配下フィールド(book2)の更新

{
  type: 'put',
  data: '{"path":"/book2","data":"great book (updated)"}',
  lastEventId: '',
  origin: 'http://localhost:9000'
}

posts配下フィールドの削除(book3)

 {
  type: 'put',
  data: '{"path":"/book3","data":null}',
  lastEventId: '',
  origin: 'http://localhost:9000'
}

いろいろ試してみたがpatchが飛んでくるケースが見つけられなかった。

あとputとpatchの違いも謎で、一見すると更新系ならpatchでも良さそうだがそれもputで飛んでくる。もしかして孫フィールドの更新ならどうだ? と思い、それぞれのbookに { name: "nice book" } のようなObjectっぽい構造を持たせて更新を試してみたが、そうすると今度はpathが /book2/name になった状態でputが送信されてくる。

Elmをローカルインストールしているとelm-language-serverのDiagnosticsが動かなくなるバグを修正するPRを投げた

github.com

仕事で開発しているElmアプリケーションとElmLSの相性が悪いのかDiagnosticsが動かないことが多かった。動くときもあるが、動かない時の方が多いレベル。もう諦めてWebpackでのビルド結果を見ながら作業をしていたが、非常に生産が悪かったのでこの気に調査してみることにした。

すると、以下の条件でElmLSのDiagnosticsがうまく動かなくなるバグがあることがわかった。

  • Elmをローカルインストールしている(npm install -D elm とか)
  • main関数を公開しているエントリポイントとなるモジュールに対するテストが存在している

なぜこのような挙動になっているかというと、ElmLSは内部的にDiagnosticsの生成の際elm makeelm-test makeを使い分ける挙動になっているため。

ざっくり言うと、エントリポイントとなるモジュールに対してテストが存在している場合はelm-test makeコンパイルを行い、そうでない場合にはelm makeコンパイルを行う。今回のバグの再現条件である前者の場合elm-testはElmコンパイラのバイナリを常にグローバルインストール前提で探すため、ローカルインストールだと見つけられずDiagnosticsが生成できなくなってしまう。今回の自分の修正では、Elmをローカルインストールしている場合はelm-testに対して--compilerというElmコンパイラのパスを指定させるオプションを渡すことでバグを解決した。

なぜelm makeではなくelm-test makeを使うような挙動が存在しているかについては、推測の域ではあるがelm-test makeのほうがコードベースを網羅的にコンパイルできるからではないかと想像している。Elmコンパイラ単体ではテストコードをコンパイルできない(TestパッケージやExepectパッケージを見つけられない)ため、アプリケーションのソースコードとテストコード両方を包含してDiagnosticsを生成するためにはelmとelm-testの両方を動かさなければいけないが、可能なケースであればelm-testだけを動かすことでDiagnosticsの生成時間を短縮できる。エントリポイントにテストがあるケースではそれに該当するわけだが、ローカルインストールされている状況が考慮されていなかったため、今回のバグが生まれたと考えられる。

abema/go-mp4で複数ストリームが含まれるmdatから音声のサンプルのみを取り出す

去年書いた以下の記事はmp4/m4aといいつつ、実はファイルの中に動画のストリームが入っているケースを考慮できていない。

izumisy.work

その記事を書いた時点では「どうやらストリームが複数ある場合にmdatは数サンプルごとのチャンクの詰め合わせで構成されているっぽい」ということしか分かっていなかった。軽く調べても簡単にわかりそうな感じでもなかったので、とりあえず音声のストリームだけがmdatに含まれる前提で話を進めることにしていたが、実際的なユースケースではmp4には動画と音声がセットで含まれているケースのほうが多い。

というわけで、そのようなケースでどのようにmdatを読み取ればいいのか改めて調べてみたので備忘録的に残しておく。

サンプルとチャンク

日本語の参考資料としては以下のWikiが最も参考になる。

github.com

これ以外にもstsc, stco, stszあたりの関係性は以下のstackoverflowが参考になった。

stackoverflow.com

これらの記事によると、複数ストリームから構成されるmp4ファイルのmdatは、複数のサンプルを持つチャンクと呼ばれる単位をひとつの塊としているらしい。

それぞれのストリームはmdat中での自分のストリームに該当するチャンクのオフセットの値を保持しているため、mdatを前から順番にサンプルサイズで舐めていったとしてもオフセット値が正しくなければ、中途半端なサンプルだったり別のストリームのサンプルを取り出してしまうことになる。従って、複数のストリームが存在するmp4ファイルにおいてはストリームのサンプルサイズだけではなくチャンクのオフセットを知ることが重要になる。オフセットが分からなければサンプルサイズが分かっても意味がない。

abema/go-mp4を使う例

abema/go-mp4は実は複数ストリームが存在しているケースを扱うのに非常に便利で、パッケージから提供されるTrackという構造体を見るだけで大体のことは完結させられる。

type Track struct {
    TrackID   uint32
    Timescale uint32
    Duration  uint64
    Codec     Codec
    Encrypted bool
    EditList  EditList
    Samples   Samples
    Chunks    Chunks
    AVC       *AVCDecConfigInfo
    MP4A      *MP4AInfo
}

ここにあるChunksというのが、まさにmdatにおけるストリームのチャンク情報そのものである。

type Chunks []*Chunk

type Chunk struct {
    DataOffset      uint32 // mdatにおけるchunkのオフセット
    SamplesPerChunk uint32 // chunkに含まれるサンプル数
}

この二つの情報が手に入れば話は早い。

自分は以下のような感じで SamplesChunks からmdat中のサンプルのオフセットとサイズを計算するロジックを書いた。やっていることはシンプルで、チャンクのカウンタとチャンク内のサンプルのカウンタを加算しながら「いまどのチャンクのどのサンプルを読んでいるか?」をイテレーションして返していくだけの実装。

type FrameIterator struct {
    samples           mp4.Samples // track.Samples
    sampleIndex       int         // 0
    chunks            mp4.Chunks  // track.Chunks
    chunkIndex        int         // 0
    chunkSampleIndex  int         // 0
    chunkSampleOffset uint32      // track.Chunks[0].DataOffset
}

type Frame struct {
    Offset uint32
    Size   uint32
}

// イテレーションしてフレームの情報を返すメソッド
func (v *FrameIterator) Next() *Frame {
    if len(v.samples) <= v.sampleIndex || len(v.chunks) <= v.chunkIndex {
        return nil
    }

    offset := v.chunkSampleOffset
    size := v.samples[v.sampleIndex].Size
    currentChunk := v.chunks[v.chunkIndex]

    if currentChunk.SamplesPerChunk <= uint32(v.chunkSampleIndex+1) {
        if len(v.chunks) <= v.chunkIndex+1 {
            return nil
        }
        v.chunkIndex++
        v.chunkSampleIndex = 0
        v.chunkSampleOffset = v.chunks[v.chunkIndex].DataOffset
    } else {
        v.chunkSampleIndex++
        v.chunkSampleOffset += v.samples[v.sampleIndex].Size
    }

    v.sampleIndex++
    return &Frame{
        Offset: offset,
        Size:   size,
    }
}

github.com

ここまで出来たらば FrameIterator へ音声のストリームに該当するTrackの値を与えてやるだけでmdat中の音声サンプルのオフセットとサイズを取得できるので、取得された情報をもとにSectionReaderあたりでファイルをシークしつつバイナリデータを取り出してfdkaacでデコードするなりすればいい。

vim-lspでelm-language-serverを使うとリファクタリング系のCodeActionが動かない件を修正するPRを投げた

github.com

仕事柄vim-lspでelm-language-serverを用いてElmを書くことが多いのだが、なぜかVimだとリファクタリング系のCodeActionが動かないことが多かった。中でも関数のexpose/unexposeが動かないのはまあまあストレスだったので、この機会に腰を据えて調べてみた。

調べた結果をざっくり説明すると、どうやらvim-lspでは codeAction/resolve というcodeActionの遅延実行的なIFが未実装らしい。一方でelm-language-serverはリファクタリング関連のcodeActionをすべて codeAction/resolve で実装しているようだった。従ってLSPクライアントでも codeAction/resolve を実装しているものでしかelm-language-serverは動かないようにできていた。VSCodeは問題なく動いていたので、おそらくIFを正しく実装しているのだろう。

というわけで、取りうる手段はvim-lspに codeAction/resolve のIFを実装する」「elm-language-serverで codeAction/resolve が動かないケースをハンドリングする」のふたつだったのだが、前者はVimScriptを読み書きしないといけなく気乗りしなかったので後者を選択することにした... そんなこんなで、時間はかかったがめでたくマージされましたとさ。

abema/go-mp4でASCの値を取得する

以下の記事ではASC(Audio Specific Config)をffprobeで取り出したが、これはmp4デマルチプレクサでも取り出すことができる。

izumisy.work

今回はabema/go-mp4を使ってやってみる。

mp4の仕様によればesdsというboxの中に入っているらしいので、それを取り出せばいい。

// esdsからASCの値を含むデスクリプタを取り出す
func getASCDescriptor(reader io.ReadSeeker) (*mp4.Descriptor, error) {
    var ascDescriptor *mp4.Descriptor

    if results, err := mp4.ExtractBoxWithPayload(reader, nil, mp4.BoxPath{
        mp4.BoxTypeMoov(),
        mp4.BoxTypeTrak(),
        mp4.BoxTypeMdia(),
        mp4.BoxTypeMinf(),
        mp4.BoxTypeStbl(),
        mp4.BoxTypeStsd(),
        mp4.BoxTypeMp4a(),
        mp4.BoxTypeEsds(),
    }); err != nil {
        return nil, err
    } else {
        esds := results[0].Payload.(*mp4.Esds)
        for _, descriptor := range esds.Descriptors {
            if descriptor.Tag == mp4.DecSpecificInfoTag {
                ascDescriptor = &descriptor
                break
            }
        }

        if ascDescriptor == nil {
            return nil, errors.New("no descriptor found")
        }
    }

    return ascDescriptor, nil
}

単なるm4aファイルに対して動かして確認してみた限り esds.Descriptors には4つ程度のデスクリプタが含まれていた。その中で mp4.DecSepcificInfoTag という値に該当するやつがASCを持っているっぽい。なのでそれを探してやればいい。

あとはこんな感じでgo-fdkaacの初期化のときのパラメタとして使える。

descriptor, err := getASCDescriptor(m4aFile)
if err != nil {
    panic(err)
} else if len(descriptor.Data) == 0 {
    panic(errors.New("no ASC available"))
}

decoder := fdkaac.NewAacDecoder()
if err := decoder.InitRaw([]byte{
    descriptor.Data[0],
    descriptor.Data[1],
}); err != nil {
    panic(err)
}

Jelly Pro 2でBluetoothの接続が安定しない

1年ほどUnihertzのJelly Pro 2を使っているのだがFitbit (Charge 4)との相性が悪いのかBluetoothの接続が全く安定せず、諦めてFitbitをただの時計として使ってきた。

さすがにちょっと嫌だなと思い改めていろいろ調べた結果、以下のRedditの投稿で少なくとも通知は来るようになりある程度Bluetoothとの接続がうまくいくようになった。

www.reddit.com

ざっくりBluetooth MIDI Service というシステムのアプリケーションがバックグラウンドで動くようにしただけだが、これまで毎回失敗してたFitbitアプリでの同期やアプリからの通知が動くようになった。